Quantcast
Channel: Management – All about virtualization
Viewing all 111 articles
Browse latest View live

How to upgrade Server 2008R2 Standard to Enterprise or Datacenter license

$
0
0

This is a short summary how to upgrade the license of Server 2008R2 Standard to Enterprise or Datacenter.

Before you change the license, be sure that you understand the consequences (change of license can result in high costs).

  • open a CMD
  • to find out the current version run:

DISM /online /Get-CurrentEdition

  • to list all possible target editions run:

DISM /online /Get-TargetEditions

  • perform the license upgrade running the following command:

DISM /online /Set-Edition:<edition ID> /ProductKey:<license key>

After running the last command, it is necessary to reboot the server. Then you can check the license with the “DISM /online /Get-CurrentEdition” command from step 1.

If you have a KMS host running in your environment you can use the following license keys for the upgrade: Appendix A: KMS Client Setup Keys

Der Beitrag How to upgrade Server 2008R2 Standard to Enterprise or Datacenter license erschien zuerst auf All about virtualization.


Virtual machine with OS Server 2008 R2 “Bootmgr is missing” error

$
0
0

A virtual machine with operating system 2008 R2 shows the following error during startup:

„BOOTMGR is missing Press Ctrl+Alt+Del to restart“

Bootmgr is missing

It is relatively easy to fix this error – here is a short how-to. This article was published about five years ago on my first blog written in German. But as I was in need of the solution today, I decided to quickly translate and repost it here (Olden but Golden if you need it…).

How to Fix “Bootmgr is missing”:


  • connect the OS installation disc (.iso) to the CDROM (if necessary change the boot options to boot from CD)
  • start the VM and boot into the OS setup
  • click “next” in the upcoming “Install Windows” wizard (Language)

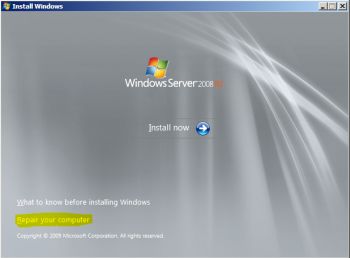
  • In the next window select “Repair your Computer” to open the “System Recovery” Wizard

  • If your operating system is listed, select “next”. If no OS is listed, change the selection box to “Restore your computer using a system image that you created earlier”. It’s no problem if you do not have a system image. All that we want is to access a command prompt. And this is possible in the next window independent from the options above.

  • Select “Command Prompt” here:

  • Now we can fix the MBR error. Just use the following commands in the order specified below:

change to C: and execute:

BCDBOOT C:\Windows

BOOTREC /FIXMBR

BOOTREC /FIXBOOT

BOOTREC /REBUILDBCD

BOOTREC /SCANOS


  • Now type “Exit” to close the command prompt and reboot the server. It should boot now without any problems!

Der Beitrag Virtual machine with OS Server 2008 R2 “Bootmgr is missing” error erschien zuerst auf All about virtualization.

Active path information (I/O) is missing after patching an ESXi host

$
0
0

In the storage path Information window, you normally find a list looking like below. It shows “Active path” and “Active Path (I/O)”:

If you are missing the “Active path (I/O)” Information after patching/upgrading your ESXi hosts do not panic.

As described in VMware KB “Active path information (I/O) missing after update to 6.0 Update 3 (2149992)” this behavior is not normal, but only a cosmetic issue.

After patching: no more “Active (I/O)”

VMware KB lists the following symptoms for this issue:

  • The ESXi host has been updated to 6.0 Update 3.
  • This issue appears in the vSphere Client and vSphere Web Client.
  • Storage path information does not display which path is active (I/O).
  • Preferred path information is not seen using PSP Fixed.

Unfortunately, there is no workaround or resolution available for this issue at the moment.

Der Beitrag Active path information (I/O) is missing after patching an ESXi host erschien zuerst auf All about virtualization.

Cannot extend VMware datastore as available unused space is not listed

$
0
0

You want to extend a VMFS datastore using vCenter, but the available unused space on the datastore is not listed in the wizzard?

extend datastore vmware space not listed

extend datastore space not listed

The reason for this is that vCenter Server applies filters to prevent possible data corruption on LUNs used by other hosts. If you connect directly to the ESXi host you can extend the datastore as the filters do not exist there:

extend vmware dataspace vCenter

So if you are sure that you want to extend the datastore, connect to the ESXi host directly and extend the datastore from the GUI. Do not forget to rescan all hosts from vCenter Server afterwards.

You can learn more about storage filters here: VMware DOCs
Please note: it is not recommended to turn off device filters!

Der Beitrag Cannot extend VMware datastore as available unused space is not listed erschien zuerst auf All about virtualization.

HPE DL380 Gen9 “Starting drivers Please wait” (P89 BIOS v2.4x in combination with a MicroSD USB Kit)

$
0
0

Note:
This issue can have various causes – the following sources will help you:


Issue:

After deploying HPE SPP07/2017 or SPP04/2017 to an HP DL380 Gen9 Server with an installed HPE Dual 8GB MicroSD EM USB Kit you experience the following error:

The server stops during early BIOS boot sequence with Starting drivers. Please wait, this may take a few moments…”

HPE DL380 Gen9 starting drivers

It seems, that there is an incompatibility between BIOS B89 v2.40 (SPP04/2017) or BIOS B89 v2.42 (SPP07/2017) in combination with the HPE Dual 8GB MicroSD EM USB Kit Firmware Version 1.3.2.202.

Resolution is to update the firmware version of the HPE Dual 8GB MicroSD EM USB Kit to 1.3.2.212 (Downloadlink: CP032103)

How to upgrade:

  • Download the firmware -> cp032103.exe
  • extract the content of cp032103.exe to C:\temp
  • connect to your ESXi host via putty (login as root)
  • place the extracted files in a tmp directory
  • mark the .vmexe file as executable using the following command: chmod +x cp032103.vmexe
  • execute cp032103.vmexe using the command ./cp032103.vmexe
  • Follow the dialog (see the example in the screenshot below):

Now the Firmware Version of the USB Kit should be as follows:

Der Beitrag HPE DL380 Gen9 “Starting drivers Please wait” (P89 BIOS v2.4x in combination with a MicroSD USB Kit) erschien zuerst auf All about virtualization.

Deploy a new virtual machine based on a snapshot of a powered-on VM

New design and logo for Running-System.com

$
0
0

Since I started blogging back in 2010 I designed the logos by myself, using a high-quality graphics program called paint. Also, the design of my websites was always very similar.

This was the theme of my very first blog vmworld.net, established 2010. It was written in German. I abandoned the site some months ago to focus on Running-System.com.

At the beginning of this year, I decided to revise the logo for Running-System.com.

I awarded TeamGraphika with this mission as I have had already a good experience with them designing my ESXTOP Troubleshooting poster for vSphere 6 for a moderate price.

I selected the Business package for 49 Dollar, as it includes six design concepts and unlimited revisions.

And it did pay off because over the months I asked them for many different studies :-).

Here you can see the old logo and design of Running-System.com

Beside other themes, I experimented with robots and even a Charly Chaplin (reflecting his film “Modern Times” from 1933). TeamGraphika really worked hard to implement my ideas but in the end, I was always unhappy.

But now, more than half a year after placing the order, I think that I found a suitable new logo for my blog.

It still contains the gear wheels with the little running man. But in my opinion in a modern and deliberately kept simple style.

Running-System.com with the new design and the brand new logo

When implementing the new logo it was of course also necessary to modify the WordPress theme’s color style.

I am quite sure, that I will make some more minor changes to the blog in the next few weeks – but for now, I am really happy with the new design.

If you have suggestions for improvement or criticism please let me know! You can write me on Twitter or just leave a comment here.


Der Beitrag New design and logo for Running-System.com erschien zuerst auf All about virtualization.

Identify VMs without a tag (Powershell, PowerCLI)

$
0
0

Tags are a really helpful vSphere feature. They enable you to add valuable information to the inventory objects and make them searchable and sortable.

Some backup solutions like Veeam offer the option to use tags as selection criteria to define dynamic backup jobs. If you make use of this possibility you need sooner or later a way to identify non-tagged VMs. Because if you miss tagging a VM, in the worst case you do not have a backup…

Powershell/PowerCLI is a great way to deal with this challenge.

You can run a script before the backup job starts identifying non-tagged VMs and assign them a temporary tag to add them to a dynamic backup job. Additionally, you can send an email with the contained VMs to be reminded to take care of them.

So let’s start with the command to display all non-tagged VMs:

$VMnoTag = Get-VM | ?{(Get-TagAssignment $_) -eq $null}

identify non-tagged VMs

Assign a tag to all non-tagged VMs identified in the step above:

Now we know all non-tagged VMs in our environment. But how can we assign a tag for these VMs to eg. add them to a dynamic backup job?  The following command assigns the tag “nonTaggedVM”:

$VMnoTag | foreach {

New-TagAssignment -Tag nonTaggedVM -Entity $_

}

Send an email listing the non-tagged VMs:

The last step in this short example is to send an email to the administrator. The short message includes all non-tagged VMs for further action. All you have to do is to insert valid addresses and an SMTP server:

$body = “No tag was assigned to the following VMs: – $VMnoTag”

Send-MailMessage -to “admin@company.com” -from “script@company.com -Subject “Missing Tag” -body $body -SmtpServer smtp.company.com


If you want to learn more about tags you may be interested in my three-part blog post “Fun with Tags”:

Fun with Tags, Episode 1: Basics and PowerCLI
Fun with Tags, Episode 2: Tags and Veeam
Fun with Tags, Episode 3: Tags and vRealize Operations Manager

Fun with Tags

Der Beitrag Identify VMs without a tag (Powershell, PowerCLI) erschien zuerst auf All about virtualization.


BIOS Settings HP DL380 Gen10 for VMware vSphere ESXi

$
0
0

The 10th generation of HP’s DL380 server is offering a greater performance for your vSphere environment.

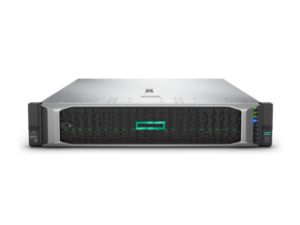
HPE DL380 Gen10Fully equipped with 24 x 128 GB LRDIMM memory modules (two processors, each supports six memory channels with two memory modules per channel), it supports a maximum of 3TB Memory.

The core count was increased, too. With the change from Intel’s Xeon E5 processors to Intel’s new C621 chipsets, you can now run the server with configurations from 4 up to 28 cores per socket depending on the used CPU.

When you implement the new HP DL380 Gen10 Server in our vSphere Environment it makes sense to take a closer look at the BIOS settings for better performance. Here is a summary of the settings I use for a standard vSphere environment.

If you feel that there is something wrong, room for improvement or not mentioned, please let me know.

Workload Profiles:


HPE simplifies BIOS configuration by offering pre-configured workload profiles. For virtualization workload, I use the profile “Virtualization – Max Performance“. When choosing this workload profile, the following options are set automatically:

SR-IOV -> enabled
VT-D -> enabled
VT-x -> enabled
Power Regulator -> Static High Performance
Minimum Processor Idle Power Core C-state -> No C-states
Minimum Processor Idle Power Package C-state -> No C-states
Energy Performance BIAS -> Max Performance
Collaborative Power Control -> Disabled
Intel DMI Link Frequency -> Auto
Intel Turbo Boost Technology -> Enabled
NUMA Group Size Optimization -> Clustered
UPI Link Power Management -> Disabled
Sub-NUMA Clustering -> Enabled
Energy-Efficient Turbo -> Disabled
Uncore Frequency Shifting -> Max
Channel Interleaving -> Enabled

Other BIOS options you should take care off:


No matter which workload profile you choose, you should review all BIOS settings carefully. Here is a list of some special settings you may need to configure:

—> System Options -> USB Options

Configuring these options is only necessary if you install ESXi on the internal SD card or a USB drive key:

  • USB Boot Support -> Enabled
  • Removeable Flash Media Boot Sequence -> Internal SD Card First / Internal Drive Keys First (depending if you install ESXi on an SD Card or a USB drive key

—> Server Availability

  • ASR Status -> Disabled

Note: ASR monitors an agent running in the Service Console. When this agent is not responding within the configured ASR timeout, the host is rebooted. However, if the agent fails or the Service Console becomes sluggish (even though the VM’s are perfectly fine), ASR will detect this as a system hang and will reboot the server. Furthermore, in case of a PSOD, ASR will reboot the server as well. This reboot might cause a loss of some logfiles.

If you do not want to disable ASR you can set the ASR Timeout using the -> ASR Timeout Setting. Choose between the following wait times:
5 Minutes
10 Minutes
15 Minutes
20 Minutes
30 Minutes

—> Processor Options:

  • Intel (R) Hyperthreading Options -> Enabled
  • Processor Core Disable -> 0 (0 = all cores enabled)
  • Processor x2APIC Support -> Enabled

—> Memory Options:

  • Advanced Memory Protection -> Advanced ECC Support (this setting provides the largest memory capacity. Alternatively you can choose “HPE Fast Fault Tolerant (ADDDC))
  • Node Interleaving -> disable (if you enable this setting you would switch to SUMA instead of NUMA!)

—> Virtualization Options:

  • Virtualization Technology -> Enabled
  • Intel (R) VT-d -> Enabled
  • SR-IOV -> Enabled

—> Boot Options:

  • Boot Mode -> UEFI (default)

—> Boot Time Optimizations:

  • Extended Memory Test -> Enabled

—> Power Management:

  • HP Power Profile -> Maximum Performance

—> Performance Options:

  • Intel (R) Turbo Boost Technology -> Enabled
  • ACPI SLIT Preferences -> Enabled

—> Advanced Options

  • Fan and Thermal Options – Thermal Configuration -> Optimal Cooling or Maximum Cooling

Note: Optimal Cooling is the default and should be sufficient. But in some best practices, you will read the recommendation to use “Maximum Cooling”.

Der Beitrag BIOS Settings HP DL380 Gen10 for VMware vSphere ESXi erschien zuerst auf All about virtualization.

How to monitor eventlog for ReFS error ID 133

$
0
0

If you use ReFS for your Veeam repositories it makes sense to monitor the Windows Event Log for error ID 133 (“The file system detected a checksum error and was not able to correct it.  The name of the file or folder is…”).

ReFS feature Data Integrity Streams validates and maintains data integrity using checksums. In case of silent data corruption, it will generate the mentioned event log record.

Here is a simple solution how you can set up an alerting rule:

  • download blat.exe (command line utility that sends eMail using SMTP)
  • create a folder (eg. C:\temp\alert) on the server holding the ReFS repositories
  • copy blat.exe into the folder folder
  • create an alert.bat file with the following content:

C:\temp\alert\blat.exe -to <recipient> -server <your_smtp_server> -port 25 -f <sender_address> -subject “Attention, found Error ID 133 ReFS Data Corruption in Eventlog”

Next, open the Windows Task Scheduler and create a new task with the following settings:

General Tab:

  • Name: Alert Error 133
  • Security options: Change User or Group -> NT AUTHORITY\SYSTEM

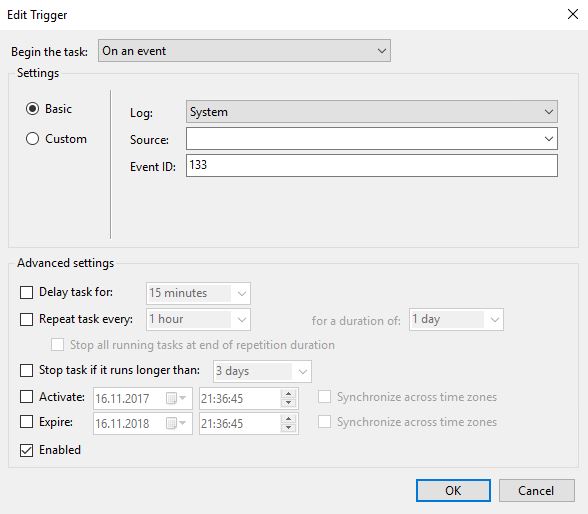
Triggers Tab:

  • NEW… -> Begin the task “On an event”
  • Basic
  • Log: System
  • Event ID: 133
  • activate “Enabled”

edit trigger to monitor error ID 133 ReEF
Action Tab:

  • Action: “Start a program”
  • Program\script: specify the path to your alert.bat file

Check the other available options if useful for you and save the task.

How can I check if the alerting rule operates as expected?

You can generate a test event with ID 133 using the eventcreate command utility.

Open a command prompt and enter the following command:
eventcreate /l SYSTEM /t ERROR /so ReFS /id 133 /d “Testevent ID 133”
eventcreate to check ReFS for ID 133
Check the System event log and you will hopefully find the created test event ID 133:

test eventlog entry ReFS ID 133

When the monitoring task is working as expected you should find a mail with the alert in your inbox.

Der Beitrag How to monitor eventlog for ReFS error ID 133 erschien zuerst auf All about virtualization.

Consideration: All systems down! Recover your Veeam Backup & Replication server

$
0
0

In this short thought experiment, I try to outline possible first steps how you can recover from a disaster described as follows. It is partly based on a real-world scenario I was told about at a VMUG meeting.

Suppose you lose your whole VMware environment due to an HBA going mad.

It arbitrary overwrites files on your VMFS LUNs and destroys all virtual machines. Your critical infrastructure as Domain Controller, application server, database server and even your Veeam Backup & Replication server are down…

In the worst case, you have no idea which host is causing the failure and you have to install some VMware hosts from scratch on replacement hardware, too.
All that remains are the Veeam repositories with the backup files. By the way, this can also happen in a similar way due to a ransomware attack…

Do you have a plan for a scenario like this?

There are various ways to recover your Veeam B&R server and production, depending on the available resources (staff, replacement hardware, time, backup data center…) and technologies (eg. Instant Recovery).

Some possibilities are sketched in the following consideration.

Let’s take a look at the environment when everything is working as expected:

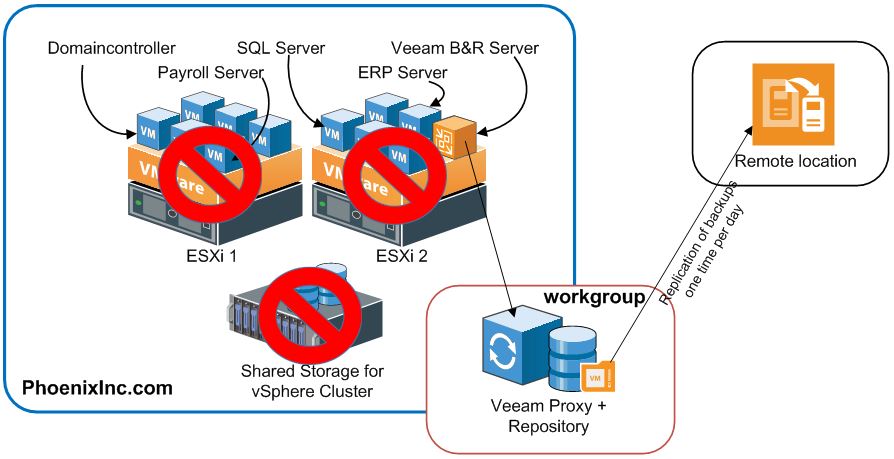
Disaster Recovery consideration example

All servers of our sample company  Phoenix Inc. are virtualized running on a small VMware vSphere Cluster. Some VMs are providing infrastructure services like AD, DNS and DHCP.  Others are hosting database services and applications.

The Veeam Backup & Replication server is virtualized, too writing the backups to a physical repository server with local disk storage. For disaster recovery, all backups are replicated to a remote location.

This is a setup that you can find in many SMB sized companies…

The fun begins, when the picture changes to something like this…

Disaster Recovery all down

Let’s stick to the failure scenario described in the beginning of this blog post.

An HBA in one of the VMware hosts went mad due to a (fortunately rare) failure situation and wiped-out all your VMFS datastores. As a consequence, all VMs are destroyed and nobody can work anymore, as critical services as Active Directory and DNS are down, too.

Unfortunately, there is no chance to use magic features like Veeam’s Instant Recovery, as the Veeam B&R Server is among the victims.

So it is time to draw up a plan how to bring the systems up and running as fast as possible…

The next moves should be…

  • install VMware vSphere ESXi on a new hardware and provide access to storage (shared storage or local disks)
  • Recover your Veeam B&R server
  • bring back the most important infrastructure services like Active Directory, DNS and DHCP asap
  • restore all other VMs depending on their RTO (recovery time objective) classification

The first task should be realized relatively easily, provided that there is replacement hardware available. All you need is a hypervisor with access to local storage/shared storage, where you can restore your VMs and a network connection.

Task two is definitely a bigger challenge. Typically you are used to relying on the Veeam Console to restore VMs, databases, and files…

Ways to restore a Veeam B&R Server:

(p) is valid for a physical installation (v) for a virtual installation

Depending on your design/DR preparations you can choose between the following possibilities to restore your Veeam B&R Server:

Replication of the VBR Server to a remote location is in place? (v)

  • Start replica in the remote location manually (no need to reinstall Veeam B&R)

Veeam Server Configuration Backup is available? (v) (p)

Veeam backup files of your Veeam B&R Server are available (.vbk file) (v)

Absolutely no Veeam B&R server backups are available

No panic! You still have some possibilities left to survive:

  • (v)(p) Install a new Veeam B&R Server from scratch and import the backups files from the surviving repositories.  Without any backup of your Veeam server you have of course lost all your settings and configurations. This is annoying, but you can fix it after you have handled the disaster. For now, you can restore your production!
  • (v) Use the Extract Utility to restore VMs without having a Veeam Installation in place and re-add them to your VMware inventory. (Veeam Extract Utility)

After a successful recovery of your Veeam B&R environment, you can start to restore your VMs depending on their RTO (recovery time objective) classification.

And soon our sample company looks again like this (hopefully): 🙂

Disaster Recovery consideration example

Short and Sweet

There are numerous possibilities to recover a Veeam Backup and Replication Server after a disaster. And as long as you have functional, current backup files available, you can even restore them without any Veeam installation.

Nevertheless, it is necessary to prepare for the different disaster scenarios and test the recovery procedures regularly.

“By failing to prepare, you are preparing to fail” (Benjamin Franklin)

Do you have better/more/other suggestions to handle this disaster? Is something wrong? Just leave a comment!

Der Beitrag Consideration: All systems down! Recover your Veeam Backup & Replication server erschien zuerst auf All about virtualization.

Active Directory Query: list locked user accounts

$
0
0

Are you looking for a quick and easy way to find all locked user accounts?

You can reach this goal with an Active Directory Query. Just follow this short step-by-step guide:

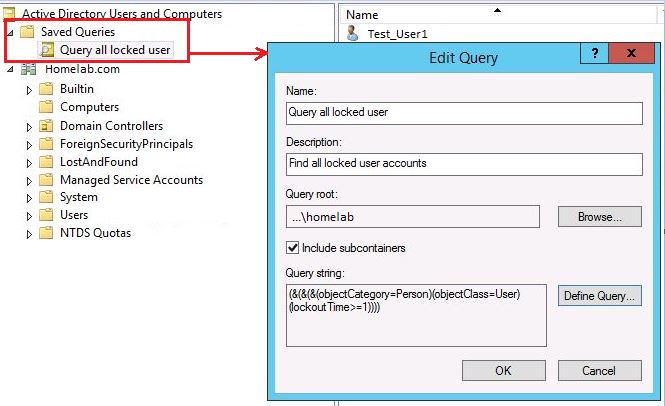
Active Directory Query: list locked user accounts

  • connect to a Domain Controller
  • open Active Directory Users & Computers
  • right-click “Saved Queries” -> New -> Query
  • provide a name for your query

Query locked user accounts active directory

  • select “Define Query…”
  • change to “Advanced” and enter the following LDAP query:

(&(&(&(objectCategory=Person)(objectClass=User)(lockoutTime>=1))))

Query find all locked user accounts in active directory

  • press OK and close the “Edit Query” window

All locked users should now be listed in the right window!

Der Beitrag Active Directory Query: list locked user accounts erschien zuerst auf All about virtualization.
Useful scripts to upgrade the virtual hardware of VMs from a list

$
0
0

If you plan to upgrade the virtual hardware (vHW) of a large number of virtual machines from a list, the following PowerCLI scripts may be useful for you.

All code-snippets are processing the virtual machines listed in a text file „C:\temp\vmliste.txt“

The scripts will help you to perform the following actions:

  • shutdown all VMs from the list
  • upgrade the virtual Hardware to the desired version (eg. 11)
  • power-on all VMs from the list

Part 1 – Shutdown all VMs from the list „C:\temp\vmliste.txt“


foreach($vmlist in (Get-Content -Path C:\TEMP\vmliste.txt)){
$vm = Get-VM -Name $vmlist
Shutdown-VMGuest -VM $vm -Confirm:$false
}

Part 2 – Upgrade the vHW to the desired version (eg. 11):


foreach($vmlist in (Get-Content -Path C:\TEMP\vmliste.txt)){
$vm = Get-VM -Name $vmlist
Set-VM -VM $vm -Version v11 -Confirm:$false
}

Part 1 – Start all VMs from the list „C:\temp\vmliste.txt“


foreach($vmlist in (Get-Content -Path C:\TEMP\vmliste.txt)){
$vm = Get-VM -Name $vmlist
Start-VM -VM $vm -Confirm:$false
}

Der Beitrag Useful scripts to upgrade the virtual hardware of VMs from a list erschien zuerst auf All about virtualization.

PowerCLI script: schedule VMs to upgrade the virtual hardware at the next reboot

$
0
0

I had the requirement to upgrade the virtual hardware of a large number of VMs to the latest available version.

The following PowerCLI script schedules an upgrade of the vHW listed in a .txt file.

The upgrade will take place the next time when the VM is restarted. So you can prepare the schedule and during the next maintenance window (eg. when OS patches are deployed) the magic of the vHW upgrade happens 🙂

How to schedule a VM compatibility Upgrade for a list of VMs using PowerCLI:


    • prepare a list (.txt file) with the VMs like this:
    • use the following PowerCLI code to schedule the upgrade for the VMs listed in the .txt file:

      foreach($vmlist in (Get-Content -Path C:\TEMP\vmliste.txt)){

      $vm = Get-VM -Name $vmlist

                      $do = New-Object -TypeName VMware.Vim.VirtualMachineConfigSpec

                      $do.ScheduledHardwareUpgradeInfo = New-Object -TypeName VMware.Vim.ScheduledHardwareUpgradeInfo

                      $do.ScheduledHardwareUpgradeInfo.UpgradePolicy = “always”

                      $do.ScheduledHardwareUpgradeInfo.VersionKey = “vmx-11”

                      $vm.ExtensionData.ReconfigVM_Task($do)

      }

Do not forget to adapt the path to your .txt file. If necessary you can change the vHW version (in the script: vmx-11)

If you take a look at the vSphere Webclient you can find a schedule for the VM compatibility upgrade. It will take place during the next reboot of the VM.

Credits: I adapted scripts provided by LucD in different threads/forums to get this job done

Der Beitrag PowerCLI script: schedule VMs to upgrade the virtual hardware at the next reboot erschien zuerst auf All about virtualization.

How to forcibly stop a dedicated Veeam job stuck in „stopping“ status

$
0
0

It may happen that a Veeam Backup Job stucks in “stopping” status.  If you search for a resolution you will stumble upon Veeam KB 1727.

Unfortunately, the provided solution will terminate ALL jobs and restores.

But how do you terminate a dedicated Veeam job stuck in “stopping” status?

Before you start please note:
Some jobs may take some time to stop, please allow up to 60 minutes for a job to stop before terminating it.

How to terminate a dedicated job:

First, find out the ID of the job you want to terminate:

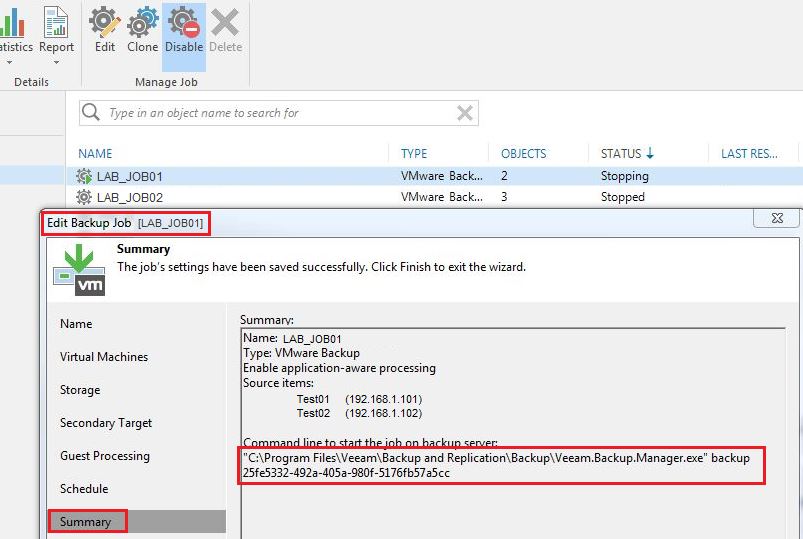
  • right-click the job in your „Veeam Backup and Replication Console“ and select „Edit“
  • change to „Summary“
  • write down the ID mentioned in the command line to start the job on the backup server:

terminate dedicated veeam job stuck in stopping state

  • open the Task Manager on your Veeam Backup & Replication Server
  • change to „Processes“
  • right-click in the header of the processes and select „Command Line“ to be displayed
  • search for the command line with the ID worked out the step before
  • right-click the said command line and select „End Task“ to terminate the process:

terminate dedicated veeam job stuck in stopping status

  • Done!

Der Beitrag How to forcibly stop a dedicated Veeam job stuck in „stopping“ status erschien zuerst auf All about virtualization.


How to – run a PowerCLI .ps1 script using the Task Scheduler

$
0
0

If you want to schedule a PowerCLI/Powershell script (.ps1) using the Windows Task Scheduler, you have to take care of the following requirements:

1. Load the PowerCLI modules

Add the following line at the beginning of your .ps1 script to load the PowerCLI modules:

Get-Module -Name VMware* -ListAvailable | Import-Module

2. Use the following settings when creating the scheduled task

When creating the scheduled task, take care of the following settings in the Action Tab:

PowerCLI Powershell Task Scheduler

Action: „Start a program“
Setting Program/Script: „powershell.exe“
Add arguments (optional): -ExecutionPolicy Bypass C:\Scripts\Test.ps1 (replace Test.ps1 with the name of your script)

You can configure all other settings in the scheduled task as you are used to it. The settings above are the only ones differing from those normally used.

Der Beitrag How to – run a PowerCLI .ps1 script using the Task Scheduler erschien zuerst auf All about virtualization.

PowerCLI script to power off/on dedicated VMs listed in a .txt file + report power state

$
0
0

I had the requirement to shut down a large number of dedicated virtual machines listed in a .txt file and to turn them on again after a short time.

Additionally, I wanted to report the power state of these VMs after the scripted shutdown in a .csv file, to ensure that they were definitely powered off.

The following code snippets were used to complete this task:

Note: all code-snippets are processing the virtual machines listed in a text file „C:\temp\vmliste.txt“

Part 1 – Shutdown all VMs from the list „C:\temp\vmliste.txt“


foreach($vmlist in (Get-Content -Path C:\TEMP\vmliste.txt)){
$vm = Get-VM -Name $vmlist
Shutdown-VMGuest -VM $vm -Confirm:$false
}

Part 2 – Generate a .csv report with the powerstate of the listed VMs:


$powerstate = @()

foreach($vmlist in (Get-Content -Path C:\temp\vmliste.txt)){

$vm = Get-VM -Name $vmlist

$powerstate += (Get-VM $vm |

Select Name,PowerState,

@{N=’VMHost’;E={$_.VMHost.Name}})

}

$powerstate | Export-Csv -Path C:\temp\powerstate_report.csv -NoTypeInformation -UseCulture

Part 3 – Power on all VMs from the list „C:\temp\vmliste.txt“


foreach($vmlist in (Get-Content -Path C:\TEMP\vmliste.txt)){
$vm = Get-VM -Name $vmlist
Start-VM -VM $vm -Confirm:$false
}

Der Beitrag PowerCLI script to power off/on dedicated VMs listed in a .txt file + report power state erschien zuerst auf All about virtualization.

Providing local S3 Object Storage for tests in your homelab with Minio Server

$
0
0

This short “How-to” should provide you a step-by-step explanation to provide a quick-and-dirty configured S3 Object Storage for tests in your homelab.

I would not recommend you to use this setup in production 🙂 But it is perfect for some quick tests.

The guide will help you to configure Minio server with TLS certificates on Windows.

What is Minio?
Minio is an open source object storage server compatible with Amazon S3 APIs.

So let’s start:

  • download Minio from github (scroll down to binary download for Windows)
  • place minio.exe on the intended server – eg. at c:\minio
  • create a directory for the data – eg. S:\cloud
  • to start your Minio server just run the following command:

C:\minio.exe server  S:\cloud (“server” is case sensitive)

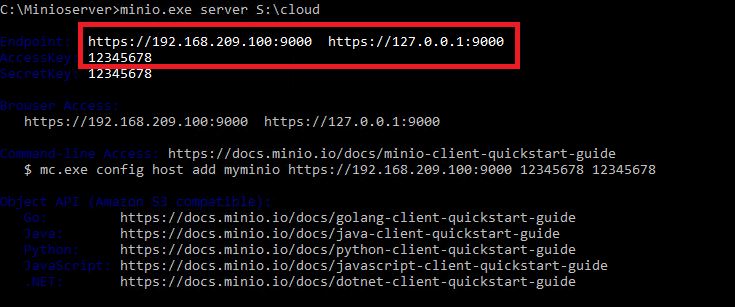
If you now take a closer look at the output you will notice three important lines:

Its hard to read the lines in blue, so here is a copy:

Endpoint: http://192.168.209.100:9000 http://127.0.0.1:9000
AccessKey: 12345678
SecretKey: 12345678

You can open a webbrowser to access your Minios Server using one of the provided links (eg. http://127.0.0.1:9000). The login-page will prompt you to input the AccessKey and the SecretKey.

By the way, you can change these keys very easy. Search for the config.json file in %directory for the data%\.minio.sys\config and open it with an editor.

In most cases you need to configure your Minios Server with TLS certificates

The next steps will help you to generate self-signed certificates using GnuTLS for Windows:

  • open the GnuTLS website
  • search for the “GnuTLS for Windows” download link on gitlab (Latest w64 version on gitlab)
  • extract the downloaded .zip file at your Minios Windows Server
  • open a cmd box and change to …\win64-build\bin
  • add the path to the GnuTLS binaries to the system path using the following command:

setx path “%path%;path_to_the_bin_folder\win64-build\bin”

  • now generate a private key using the following command:

certtool.exe –generate-privkey –outfile private.key

For the next step open an editor and copy/paste the following content into it. Then customize the fields if you want (for a quick and dirty local installation you can leave them as is). Save the file as cert.cnf

####### cert.cnf ######

# X.509 Certificate options

organization = “Your Company”

# organizational unit
unit = “storage departement”
state = “Test”

# two letter country code
country = “EX”

# your name
cn = “Hugo”

# certificate will expire in xxx days
expiration_days = 365

dns_name = “localhost”
ip_address = “127.0.0.1”
tls_www_server
encryption_key

################

  • to generate the public certificate now enter the following command:

certtool.exe –generate-self-signed –load-privkey private.key –template cert.cnf –outfile public.crt

Congrats, you generated the necessary certs quick and dirty for your testlab 🙂

  • Copy the generated certificates to the Minio config path. In your windows installation this should be: C:\Users\<your user name>\.minio\certs

If you start your Minio Server again with the command from above…

C:\minio.exe server S:\cloud

.. you can see that its now possible to access your Minios Server via https://

To create a bucket you can now login to your Minios server. Using the big red cross downright you can add a bucket.

Note:
As already mentioned, this is a really quick and dirty configuration for homelab usecases only!

Der Beitrag Providing local S3 Object Storage for tests in your homelab with Minio Server erschien zuerst auf All about virtualization.

How to migrate your Veeam SQL Database to a new SQL Server

$
0
0

This step-by-step manual should help you to migrate your Veeam SQL database to a new database server without dataloss.

Before you begin:
If your Veeam Server/database server is a virtual machine you can take a snapshot for fast recovery if necessary

Learn more about the supported SQL Server versions here:  helpcenter.veeam.com

Step 1:
Stop all backup and backup copy jobs and disable them

Step 2:

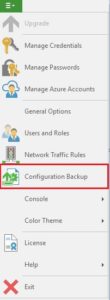
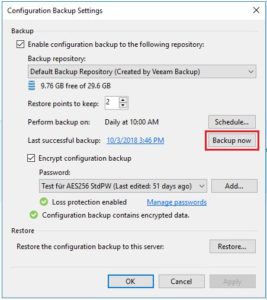
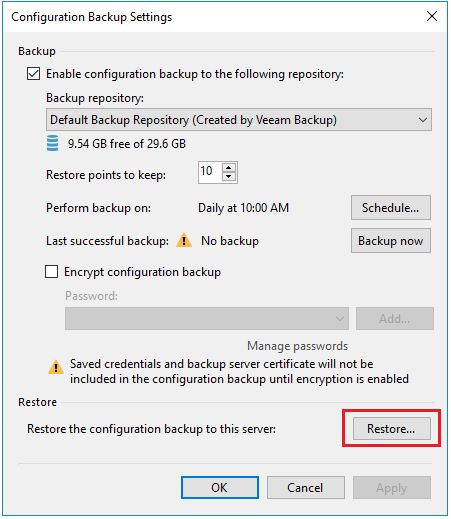
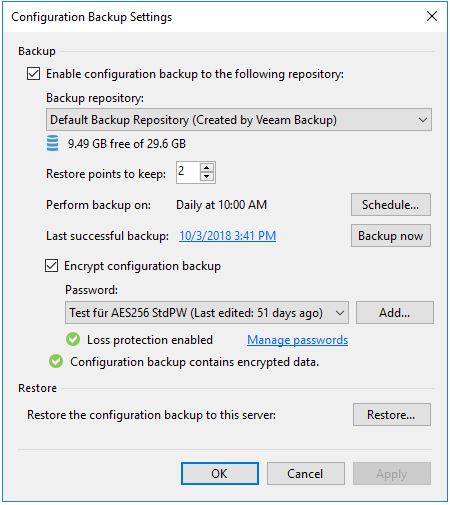
Open the Configuration Backup Settings. Perform a manual configuration database backup and take care that you keep it at a safe place. You can start a manual backup with the “Backup Now” button:

Step 3:

Now it’s time to change the database configuration settings.
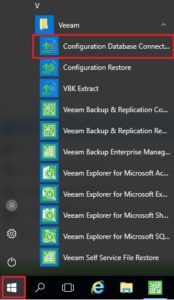
Open Start -> Veeam -> Configuration Database Connection Settings


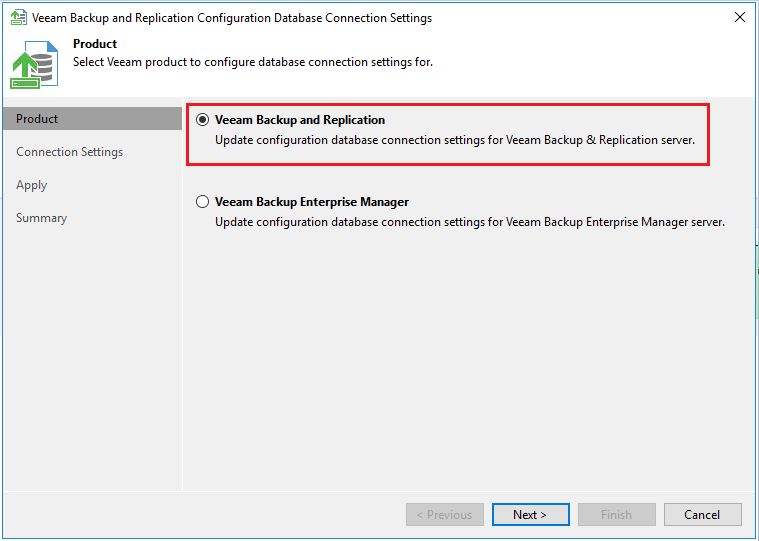
Select “Veeam Backup and Replication” and click “Next”

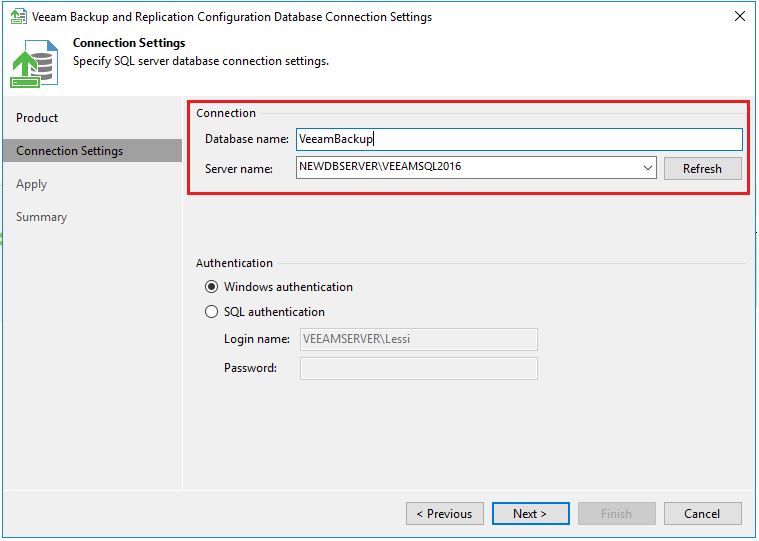
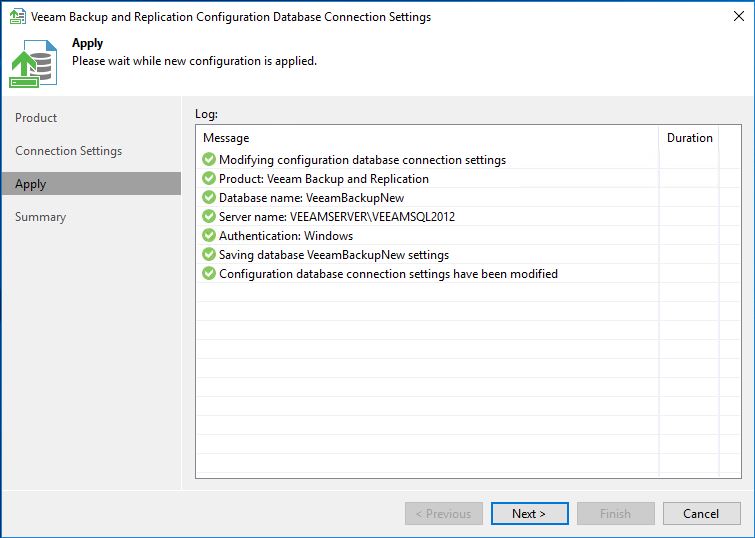
In the next window you can enter the server name of the new SQL database server. Here you can change the database name, too. If the database does not exists it will be created automatically. Provide the necessary credentials to access the database server and to create a database:

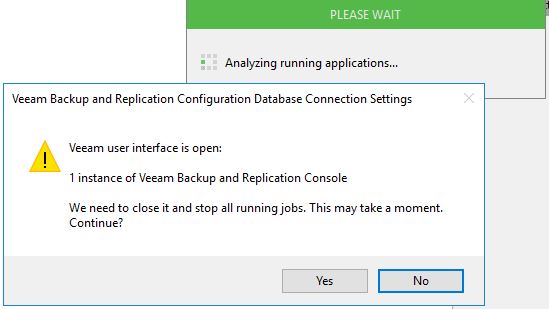
Answer the following question with “Yes”:

After some time you should see the following window. Click “Next” to proceed:

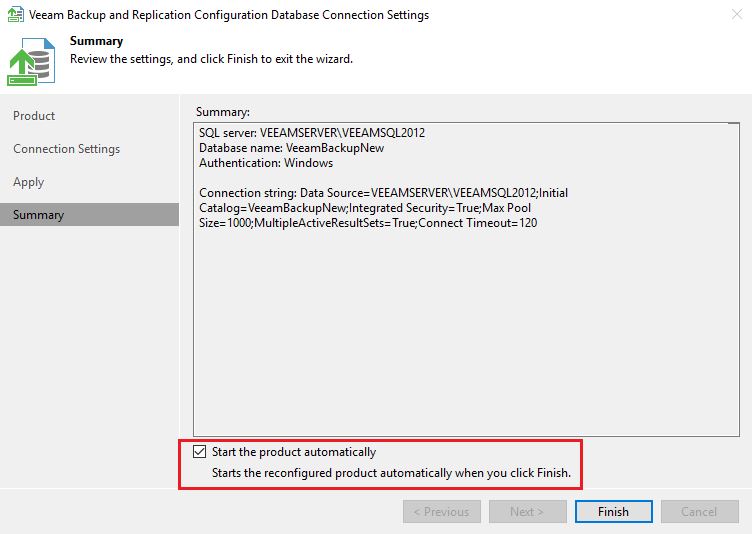
Select “Start the product automatically” and click “Finish”

Step 4:

Restore of the Veeam Configuration Database:

Open the Configuration Backup

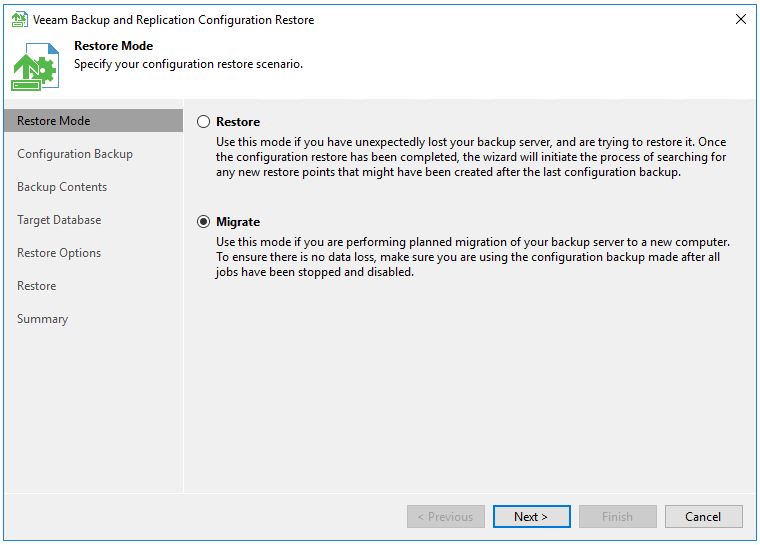
Select “Restore”

Select “Migrate”

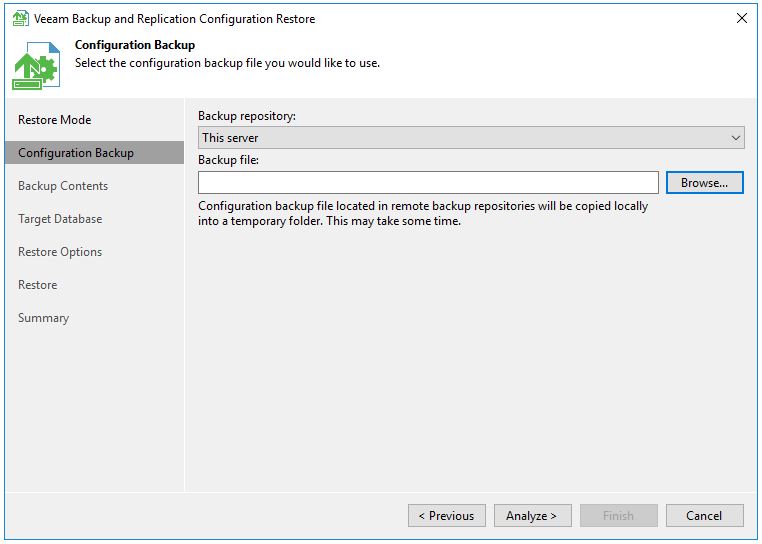
Use “Browse” to enter the path to your Veeam Configuration Database Backup and click “Analyze”

The backup content will be displayed, click “Next” to proceed

Specify the configuraton backup’s password and click “Validate”:

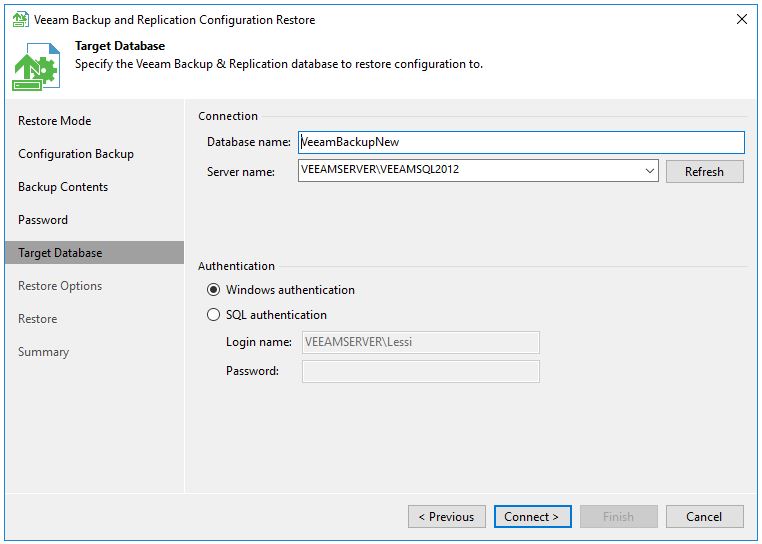
The next windows should already display the settings of the new database server / database name. If necessary provide credentials and click “Connect”

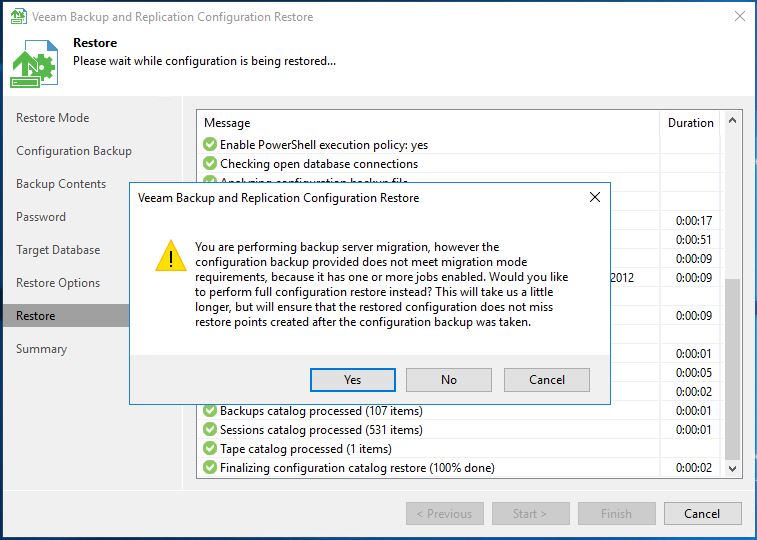
Click “Yes” to proceed:

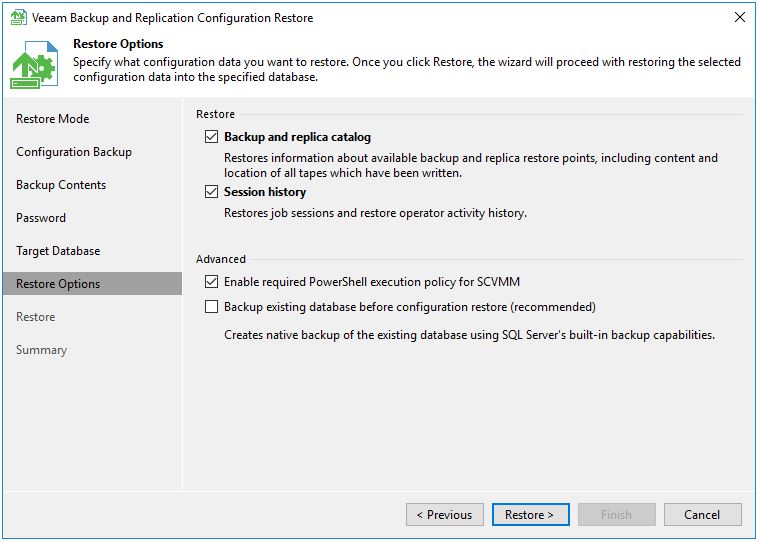
Uncheck “Backup existing database before configuration restore” and click “Restore”

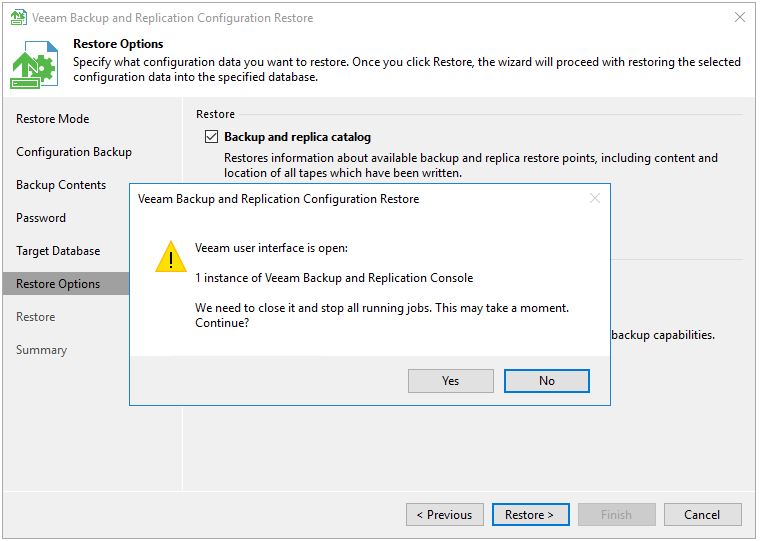
Answer the following question with “Yes” to proceed:

Now the database restore starts. It will take some time until you can answer the following question with “Yes”:

Click “Next” in the Credential Window. Finally the following Summary should be displayed. Click “Finish”:

Step 5:

Open the Backup Enterprise Manager
select “Configuration”
select “Key Management”
click “Activate” to reactivate the Enterprise Manager Key for your Veeam Backup & Replicaton Server


Step 6:

Last but not least you should take care to reschedule your configuration database backup. Open the “Configuration Backup” Settings and check twice if you can see the green tick “Loss protection enabled”.

Configure all necessary settings to ensure that you have a working configuration database backup. You can now immediately perform a backup of your new configuration database.

Congrats, you have successfully changed your Veeam database settings.

Do not forget to enable your backup and backup copy jobs. Take a closer look at your backup infrastructure to ensure that everything is working as expected.

Der Beitrag How to migrate your Veeam SQL Database to a new SQL Server erschien zuerst auf All about virtualization.

How to use VeeamPN to connect to your homelab when on the road

$
0
0

Homelabs – best invest in your education

Homelab sweet homelab

I am a huge fan of homelabs. I can test software, learn for exams (eg. Veeam VMCE, VMware VCP,…) or investigate error scenarios from customers.

My current homelab is not very powerful, but I am able to run a good number of virtual machines and nested ESX hosts. It is running on a HPE DL360 Gen8 server with 2×6 Cores and 160 GB RAM.

To save power I use a powerplug that I can switch on/off with Amazon Alexa or a smartphone app. All virtual machines and nested ESX hosts are configured to power on automatically.

Unfortunately, when on the road I had no possibility to connect to my homelab. I tested different possibilities over time, but I was not really happy with any of them. But then a colleague told me about Veeam Powered Network (VeeamPN) for simple and secure VPN networking. VeeamPN is easy to deploy and it is free of costs!

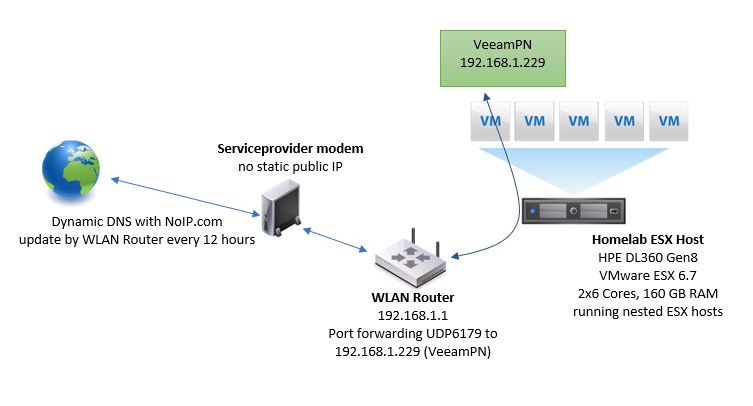
Here is a brief overview how I can now connect from remote to my homelab:

VeeamPN for your homelab

Veeam Powered Network is running as a virtual appliance on my ESX host. I connect to VeeamPN with an OpenVPN client running on my notebook. As my public IP address changes every 24 hours in the worst case, I use NoIP.com as a dynamic DNS service. Luckily my WLAN Router (Xiaomi Router 3) works together with NoIP.com and takes care that an IP change not remains undetected.

These steps are necessary if you want to use VeeamPN, too:

  • if you do not own a static public IP address use a dynamic DNS service like NoIP.com or similar
  • deploy the VeeamPN appliance
  • configure port forwarding if necessary
  • configure VeeamPN for your notebook
  • install/configure an OpenVPN client on your notebook

How to deploy the VeeamPN appliance

Some helpful hints:
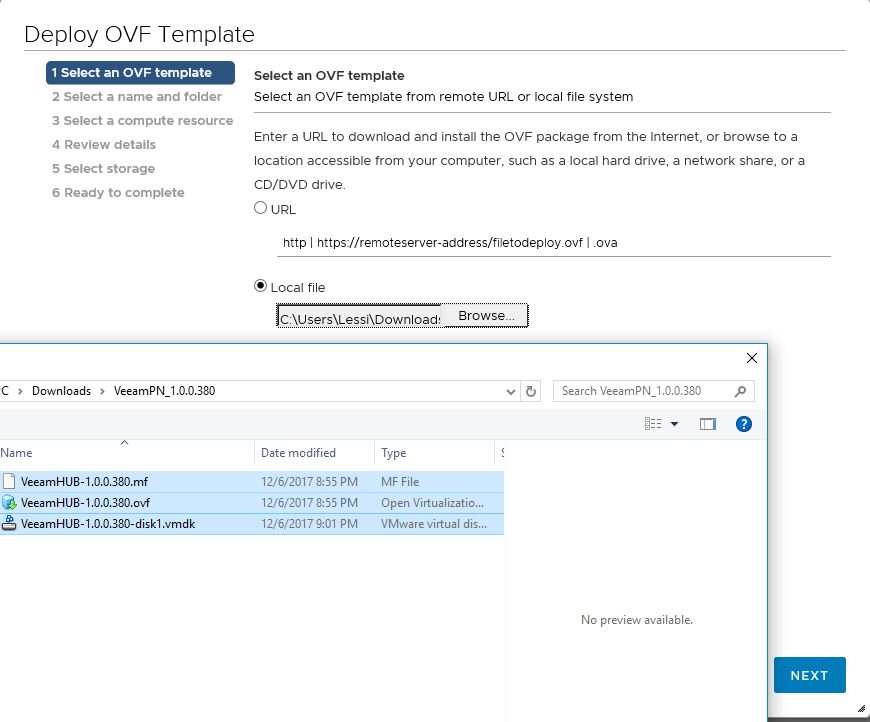
Extract the .ova file before deployment. Then you can provide the deployment wizard with the OVF and VMDKs as separate files.
If deployment of the OVF fails using vCenter, try to deploy it directly to an ESX host.

  • connect to your vCenter
  • rightclick VMware Host – “Deploy OVF Template”

In the deployment wizard window perform the following steps:

  • select “Local file” and mark all three downloaded extracted files. Then click “Next”
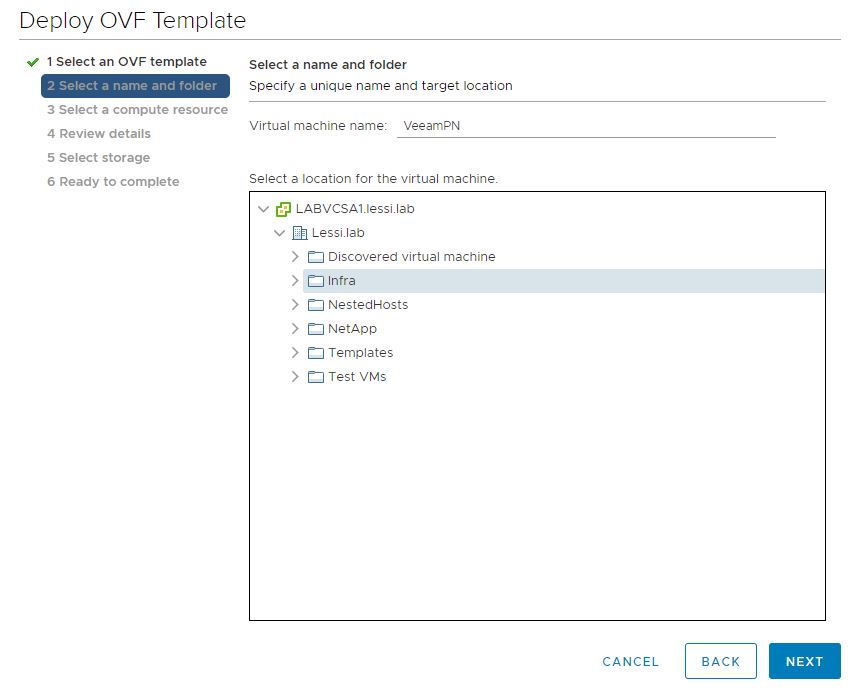
  • specify a unique name for the virtual machine
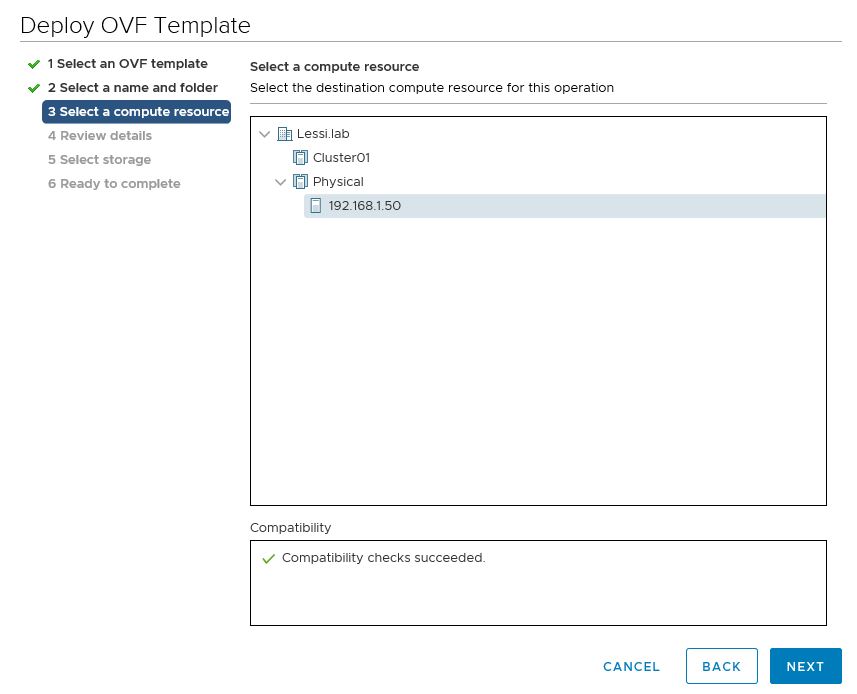
  • select a destination host for your appliance
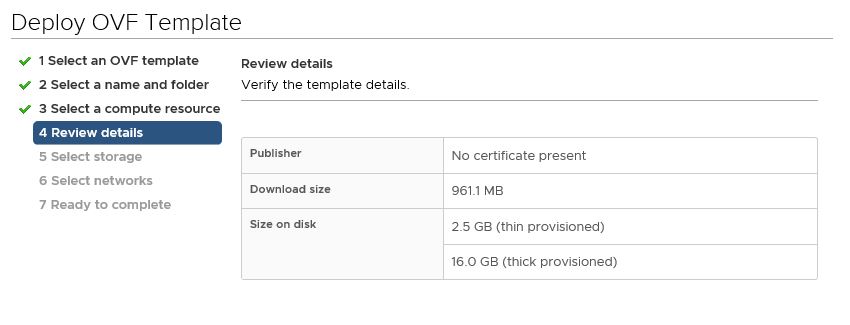
  • review the details
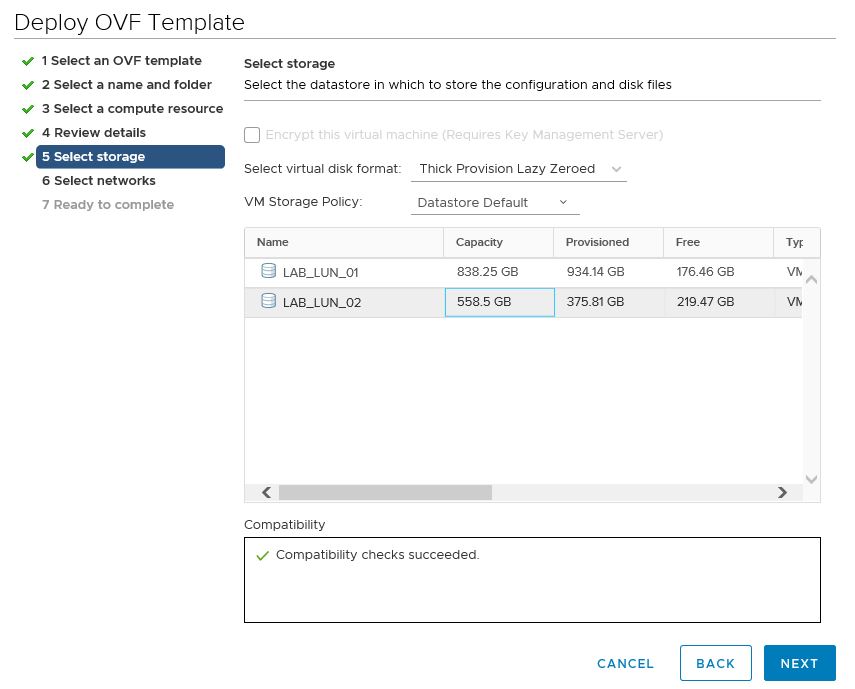
  • select the datastore where you want to deploy the appliance
    Note: 16 GB storage are necessary for the appliance
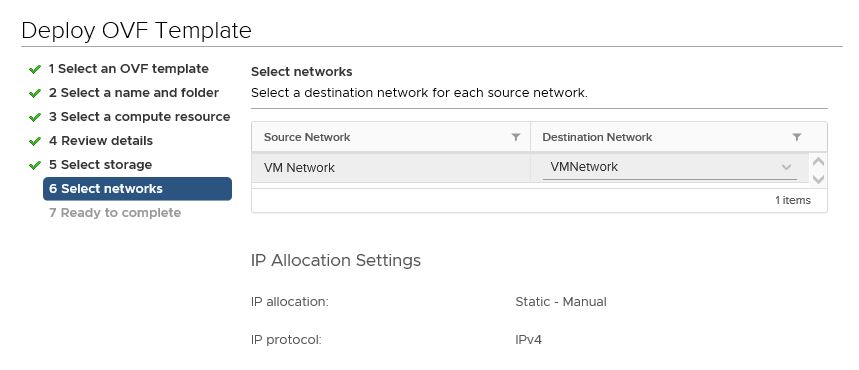
  • define the network settings for the appliance
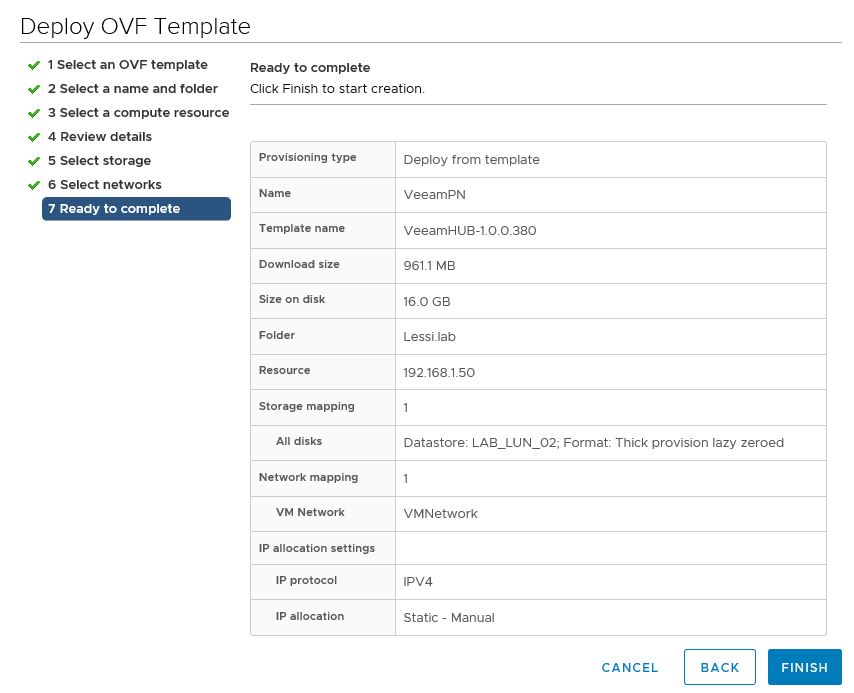
  • review the settings and click “Finish” to start the deployment

VeeamPN configuration

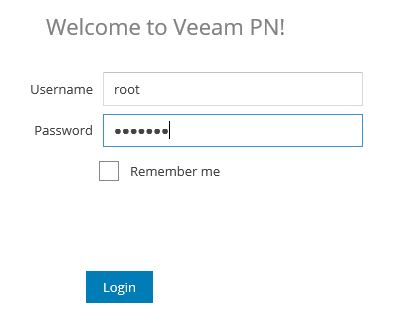
When the VeeamPN Appliance is up and running find out the IP address (vSphere Web Client – Summary Tab). Open a browser and connect to the IP. For the first login use the following credentials: User “root” and password “VeeamPN”.

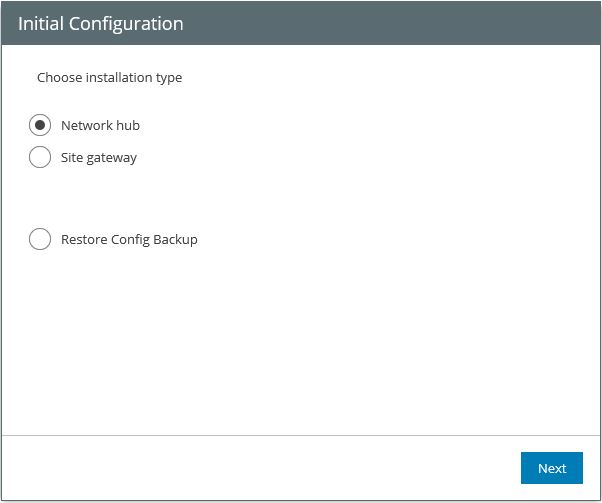
In the first step of the initial configuration window choose “Network hub” as installation type:

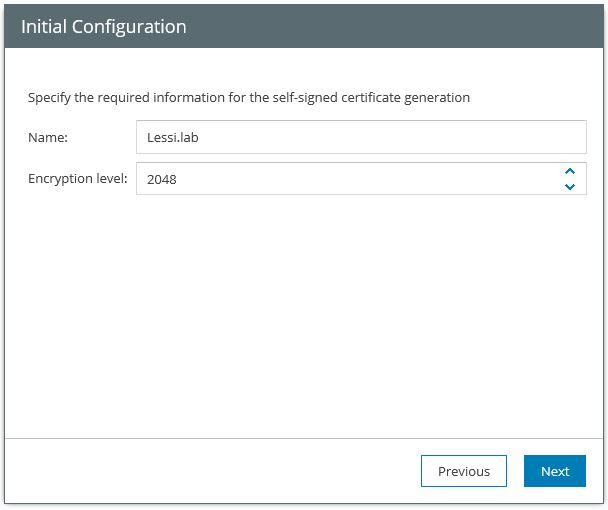
Specify the parameters for the self-signed certificate: your name or company name and the encryption level:

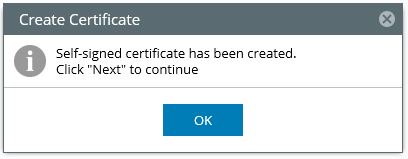
Veeam will now generate a self-signed certificate for you. This can take some minutes:

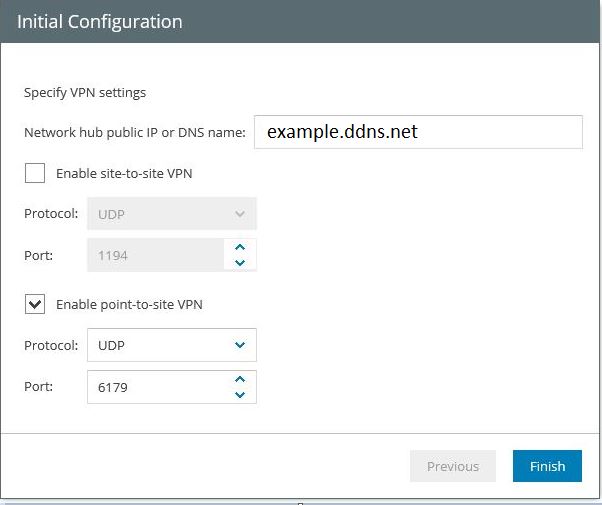
Now specify a public IP or DNS name. If you use NoIP.com use your dynamic DNS name, eg. example.ddns.net. As I want a point-to-site VPN I enabled the second tick box. Then click “Finish”.

As you can see in the screenshot above the used protocol is UDP / Port 6179. Do not forget to forward this port on your router to the internal IP address of the VeeamPN appliance.

Add a client profile to VeeamPN

Now you can connect to the VeeamPN appliance with a webbrowser to configure a client profile for remote access.

Open a webbrowser and connect to the internal IP address of the appliance. Login with user root and your password.

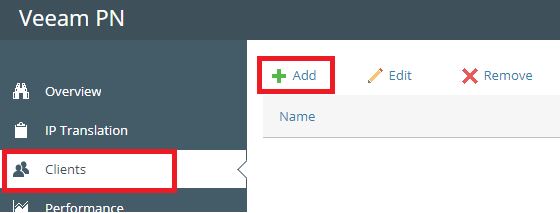
To add a client profile for your notebook/client select “Clients” on the left side of the window and then click “Add”:

  • select “Standalone Computer”
  • specify a name for your profile (eg. Notebook)
  • enable the tick box “Use HUB server as a default gateway (all internet traffic will go through HUB)”
  • Finish

Configure your VPN Client

The last step is to download an OpenVPN Client (eg. OpenVPN Community Download) and configure your VPN settings.

VeeamPN offers you the possiblity to download a ready-to-use configuration file which you can import in your VPN Client. You can find the configuration file download in next to your client profile.

That’s it – have fun with your homelab when you are on the road!

Summary

VeeamPN offers you a secure and easy to deploy solution to connect to your homelab. It only takes you about 30 minutes to configure and test all necessary components. And the best: it is free of costs!

Der Beitrag How to use VeeamPN to connect to your homelab when on the road erschien zuerst auf All about virtualization.

Viewing all 111 articles
Browse latest View live


<script src="https://jsc.adskeeper.com/r/s/rssing.com.1596347.js" async> </script>