Step-by-step guide how to upgrade Veeam Backup & Replication to Update 4
Start the Setup.exe with “Run as administrator”
start the upgrade for Veeam Backup & Replication
accept the license agreement -> click next
review the installed components and click “next”
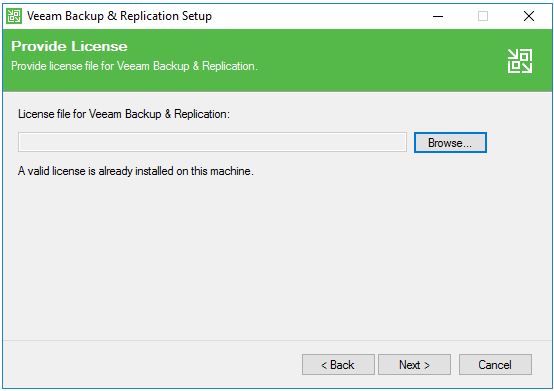
provide a valid license file for Veeam Backup Enterprise Manager:
specify Veeam Backup & Replication service account credentials. Its recommended to use the Local System account:
specify the SQL Server Instance for the Veeam Backup & Replication database:
click “Yes” to proceed:
enable “Update remote components automatically” if this is applicable for you. If you want to perform these upgrades later in the console do not tick the box. Click “Install” to start the upgrade process.
after some minutes you should see a notice stating “Installation succeeded”. Click “Finish” to proceed with the upgrade of Veeam Backup & Replication.
Note: it’s always a good idea to restart your system after an upgrade…
When the upgrade finished successfully please check if everything is working as expected.
Do not forget to enable any scheduled jobs that you have disabled before the upgrade.
When everything is fine you can delete the snapshots (if you created any for safety reasons)
This article should help you with some hints and screenshots to upgrade your production environment to Veeam 9.5 Update 4 successfully. It is divided into two parts:
Part 1:
prerequisites
helpful hints
Step-by-step guide how to upgrade Veeam Enterprise Manager
Take your time to read the Release Notes carefully! Even if a Veeam upgrade process is normally pretty straightforward clicking next, next, next through the wizzard, there may be some prerequisites to take care of.
Before you start with the upgrade take care of the following hints:
Are you using Cloud Connect? If yes, please contact your Cloud Service Provider before you perform the upgrade and check if they already support U4.
Are you using Veeam ONE? If yes, than please first perform the upgrade of VeeamONE.
Are you using an older version of Veeam Backup & Replication? Take care of the upgrade path.
Is the Operating System of your backup server supported? If not, you must first upgrade the OS of your backup server to a supported version.
Are you using a remote SQL Server for your Veeam Database? Please check if your SQL version is supported (and perform an upgrade if necessary):
Make sure there are no active processes, such as any running jobs and restore sessions. It is not recommended to stop running jobs. Please let them complete successfully. Disable any periodic and backup copy jobs, so that they do not start during the upgrade.
Important – Backups are your friend:
.) Perform a backup of your configuration database
.) If Veeam/Enterprise Manager is installed on a virtual machine create a snapshot of the VM (for safety reasons in case of issues during the upgrade)
Step-by-step guide how to upgrade Veeam Enterprise Manager
Start the Setup.exe with “Run as administrator”
Take care of the notice: “Please upgrade Enterprise Manager first” -> start the upgrade for Veeam Backup Enterprise Manager!
Note: if you do not use Enterprise Manager click here to skip this step and proceed with “Step-by-step guide how to upgrade Veeam Backup & Replication”
accept the Veeam License agreement
review the installed components and click “next”
.) provide a valid license file for Veeam Backup Enterprise Manager:
if any component failed the system configuration check you can install it using the “Install” button. When all components passed the check click “Next” to proceed:
specify Veeam Backup Enterprise Manager service account credentials. Its recommended to use the Local System account:
specify the SQL Server Instance for the Veeam Backup Enterprise Manager database:
click “Yes” to proceed:
click “Install” to begin the upgrade of your Veeam Backup Enterprise Manager installation:
after some minutes you should see a notice stating “Installation succeeded”. Click “Finish” to proceed with the upgrade of Veeam Backup & Replication.
Note: it’s recommended to restart your system before you proceed with the upgrade of Veeam Backup & Replication
It’s ime to upgrade my vCenter Server Appliance from vSphere 6.7 to Update 1b. This is a quick walkthrough to give you an idea of the necessary steps. If you plan the upgrade for your production prepare it carefully!
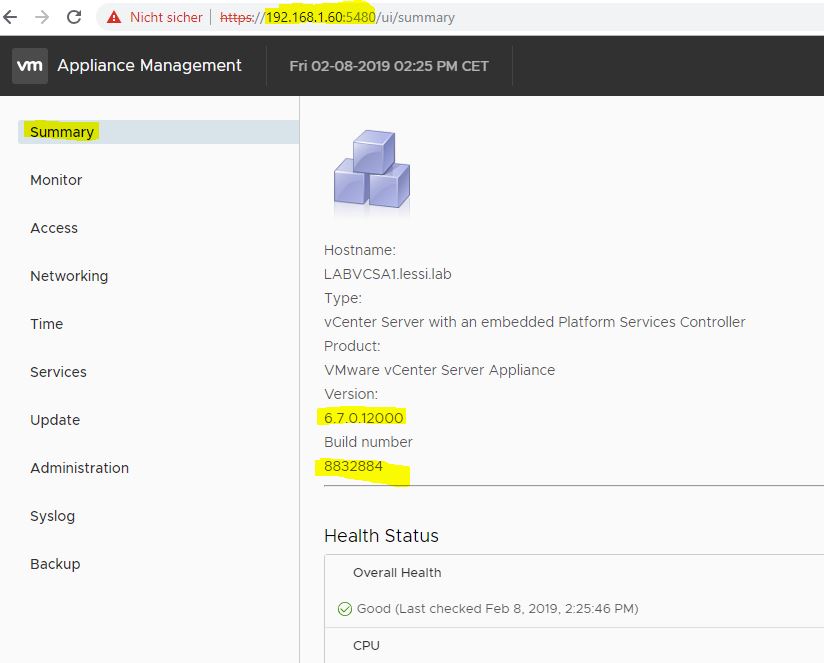
open a webbrowser to: IP_address:5480 login using your credentials check the summary page to view the actual version/build:
change to the “Update” tab to display the available updates select the desired version eg. 6.7.0.2100 (= version 6.7 Update 1b) and expand the update information by clicking “>”
Note: Updates and patches are cumulative. The most recent update or patch in the table will contain all previous patches.
run the “Pre-Update Check” (blue link)
Note: if the check fails with the error: Appliance (OS) root password expired, and you are not able to change it in the GUI, follow VMware KB 2147144 to reset the password
You can choose between two options:
Stage only (and install it later) Stage and Install (perform both steps)
Before the installation process begins, a wizard comes up. Click through the following steps:
.) End user license agreement .) Join CEIP .) Backup vCenter Server
Click “Finish” to start the installation:
The uprade proccess wil take some minutes to complete:
Check you system and delete the snapshot (if you made one…). Your system is now up2date!
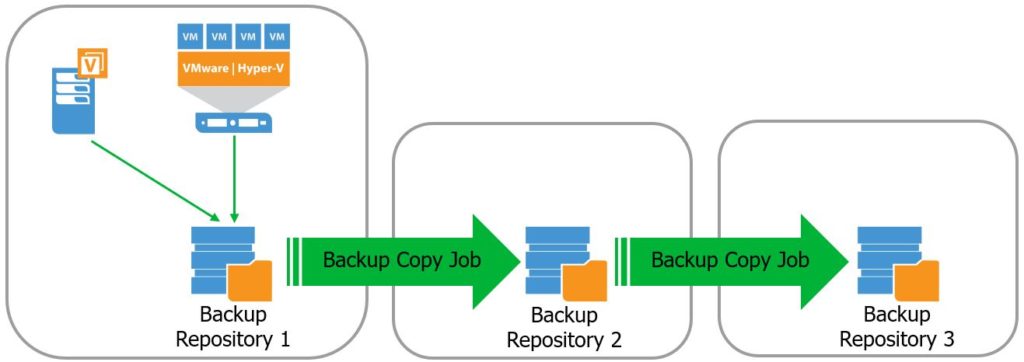
Have you ever asked yourself if it is possible to configure a Veeam Backup Copy Job (BCJ) from a BCJ? A scenario that looks like this:
The answer is yes, it is possible!
Just create a new (second) Backup Copy Job, define a name and go to step 2 in the wizard (Objects)
Click “Add” and select the backup data that you want to copy (probably the same data as already used in Backup Copy Job 1).
Then select “Source” on the right. In the new opened window you can now define a source repository from which the job should obtain the data:
In the next step (Target) define Backup Repository 3 as the target. After successfully finishing the wizzard the new created backup copy job will use the Backup Repository 2 as data source!
Storage capacity for a Veeam Repository is mounted via “Server A”. Now the storage should be provided by a new “Server B”. The repository is part of a Scale-out Repository. After these changes, everything should behave as usual.
Starting point is a Scale-out Repository containing two extents. Both are provided via “Server A” (Servername = VeeamV10):
Repository “TestMoveRepo1” already contains backup data. We will change the host server of the repository in this example to a new installed windows server:
How-to:
To provide the repositories by “Server B” instead of “Server A” you have to process the following steps:
Stop and disable all backup jobs and backup copy jobs using the involved Scale-out Repository as target or source
in the console change to “Backup Infrastructure” – “Scale-out Repositories”
open the properties of the involved Scale-out Repository and remove the repository (in our example “TestMoveRepo1”) from configuration
answer the upcoming warning (see screenshot) with “Yes”
in “Backup Repositories” right-click the repository you want to change and select “Remove”.
answer the question ” Delete this Backup Repository?” with “Yes” (no backup data on the repository will be deleted. It will only be removed from configuration):
disconnect the storage capacity from Server A und reconnect it to the new Server B
in the console select “Add new Repository” to add the repository now connected via Server B. Take care to provide the same configuration settings as before.
as soon as the repository is available you can add it to the Scale-Out Repository as an extend
finishing the wizard will update the repository information:
in the overview you can see that the host server changed from “VeeamV10” to “192.168.209.11”:
Verify your configuration changes:
running a backup job using the moved repository as target should work as expected. As you can see in the screenshot below, an additional incremental file was created in the moved repository without any issues:
This article provides a step-by-step guide how to move existing Veeam backup data from a simple repository to a scale-out backup repository (SOBR).
There are two different variants to reach this goal. Depending if you need a redistribution of files at the target SOBR or not choose the appropriate way:
Variant 1:
Move backup data to a SOBR and distribute the backupfiles equally on the related repositories
Create a dummy repository
place the existing backup files in there
rescan the repository
add the dummy repository to the existing scale-out repository (SOBR)
right-click the newly added repository -> Maintenance mode
right-click the newly added repository -> Evacuate backups
files will be automatically redistributed to other extends
when empty, remove the dummy extend from the SOBR
remove the dummy repository from configuration and delete it
map the pre-existing backup job to the backup files new location
Variant 2:
Move backup data to a SOBR, redistribution of files is not desired
In this case simply copy the folder containing VBM and backup files to one of the existing extents.
Rename both path and VBM to ensure import, and re-scan the scale-out backup repository.
Veeam Version 10 introduced a new feature that is really useful for your still present physical devices like servers, workstations and clients.
I am pretty sure that you take care of most them in your backup strategy. If you count on Veeam as your favorite backup vendor you will use Veeam Agents for Windows and Linux to fulfil this task.
Before Version 10, you were already able to restore your agent based backups of physical devices in various ways:
bare-metal restore to a physical device
instant VM recovery to Hyper-V
export disk content as virtual disks
restore single guest files/folders
restore application items (eg. Active Directory, Exchange,…)
restore to Amazon EC2
restore to Microsoft Azure
With Veeam Version 10 you can now restore Veeam Agent backups created on a Veeam backup repository instantly to VMware ESXi hosts. They will start on your virtual VMware infrastructure within some minutes.
The target VM will apply the same settings as it’s physical source. Same amount of RAM, cores, volume size and so on. Having said that, you should take care that the target host has enough resources to host the restored server.
But of course you can change necessary settings when clicking through the restore wizard. If needed you can create a new BIOS UUID, select the target host, VM folder, resource pool and so on.
Networking…
In case of physical to virtual conversion the network part is rather important.
The wizard enables you to change the former physical network settings straightful to a virtual one. Just select the source adapter and choose the target virtual network you want to use.
Veeam Secure Restore…
Please note that even during “Instant VM restore to VMware” Veeam Secure Restore is available! This special feature enables you to scan the restore stream to identify malware.
If you activate Secure Restore, the Anti Virus software installed on your Veeam Server will be used for this task. A really important feature in times of ransomware & co.
Finishing the wizard will immediately start the instant restore process and within minutes the former physical device is available for you as a VMware virtual machine:
In a last step you have to migrate the instantly recovered VM to production. This is only one fast click in the Veeam console:
Planned p2v conversions…
You can use this feature not only for emergencies after a breakdown of your physical device.
It’s also a proper way to convert your physical devices into virtual ones instead of using VMware Converter. The big advantage here is, that downtime for conversion is reduced to a minimum.
Just perform a first full backup and before starting instant VM recovery, run an extra incremental backup to take care of the changes. This incremental run will only take some minutes. And as soon as it is finished you can power-off the physical server and power it on as a virtual one.
With Veeam Version 10 two new options were added to the backup job settings.
The first one is addressing the retention policy.
Retention policy
It was always possible to define the number of restore points to keep.
So if you performed one backup run per day and configured the setting to eg. 14, one might think that you can reach back for two weeks.
This was true as long as no extra backup runs were triggered manually. Because each extra run took away one day…
With Version 10 you can simply configure a “number of days” instead of a “number of restore points”.
So no more fear that you cannot reach back as long as expected. And no more need to calculate the correct settings (whats the correct setting when I perform four backups a day and want to keep them for 90 days :-)
GFS Retention Policy within the backup job
If you ask yourself, what the heck is a GFS retention policy? GFS means “Grandfather-Father-Son”.
It’s the possiblity to store backup files for long periods of time – weekly, monthly and even yearly backups.
Before Version 10, only a “backup copy job” was able to process a GFS retention policy.
Now the backup job itself offers this possiblity, too:
You can activate it with the tick-box and configure the number of weekly, monthly and yearly backups using the “Configure…” button.
Please note, that Veeam takes care to save storage IO and space when building these full backup files for long-term retention:
No new backup files are created for this purpose. It uses backup files already created and marks them with a GFS flag.
What does this mean? If you use for example an incremental forever backup chain, one full backup file (.vbk) and a given number of incremental files (.vib) will be created:
If you configured GFS to perform an eg. weekly Full Backup at the last Sunday, you will only find an incremental file (.vib) file as shown above. But Veeam will flag the Sunday .vib file with the GFS flag:
As time flies by, every day a new incremental file will be created. And the oldest .vib file will be merged into the first full file (.vbk) to only keep the configured number of restore points.
After six days, our GFS flaged .vib file will be merged into the full file. And so here it is – our weekly full backup file as configured. But no need for IO operations to create an extra full backup file for GFS.
The second place where Veeam tries to save space is if you configure weekly and monthly GFS full backups. The software takes care to use one of the weekly fulls as a monthly full, too.
Two small details – but a big impact for the backup job configuration usability!
More Veeam Backup & Replication Version 10 features?
Just a short note if you try to restore VMs via SAN, but the restore always falls back to NBD.
One reason worth to check is the “current read-only state” of the mapped LUNs at the Veeam Proxy server.
You can check the disk status with diskpart:
open a command prompt (cmd)
enter “diskpart”
enter “list disk” to view all mounted disks
Select the affected disk where the restore via SAN is not working by the disk ID:
enter “select disk x” (x = disk ID)
If you enter “list disk” again, the selected disk should be marked with a “*” sign:
enter “attributes disk” to list the disk attributes
Check the “Current Read-only State” and “Read-only” state. If it states “Yes” you cannot perform a restore via SAN. If it states “No” you have to take care of other limitations.
If the disk is “Read-only: Yes” you can change the state with the following command (take care that the correct disk is selected!):
enter “attributes disk clear readonly”
With the command “attributes disk” you can now check if the Read-only state is set to “No”.
Please rescan the disks before you start a new restore process. It may take some time until the new disk state is recognized correctly.
If you want to set the Read-only state back to “Yes” just use the following command:
Have you ever heard of Veeam Intelligent Diagnostics? It’s a small but excellent feature – maybe a little bit hidden in Veeam ONE.
It enables Veeam ONE to automatically detect known issues in configuration and performance of your backup infrastructure, based on signatures provided by Veeam Support. So no calling home, everything happens on-premises.
Let’s take a look where you can find this powerful feature and how it works.
The first step is to deploy a Veeam ONE agent to your Veeam Backup & Replication Server.
This happens by default when you connect a Veeam Backup & Replication or Veeam Backup Enterprise Manager Server in Veeam ONE Monitor. But it’s possible to skip this step to install it later.
You can check the status of your Veeam ONE agent:
open Veeam ONE Monitor
change to the “Data Protection View” (at the bottom, left corner)
select the main node in the inventory pane (left window)
A list with the connected backup server(s) will be displayed, next to it the status of the Veeam ONE agent:
If the agent is not installed, perform a right-click and select “install agent” in the context menu:
To start the signature update manually just click the “update signatures” button:
The agent is installed, the signature up-to-date, what’s next? Right-click the backup server and choose “Agent settings…” in the context menu.
Two tick-boxes are displayed to enable different action settings:
Remediation actions
Tick box number one allows to enable/disable the remediation actions. There are various actions available. You can find an up-to-date list here:
New VMs are deployed for testing, and sooner or later they go into production. Unfortunately no one takes care that the VM is part of a backup job.
Veeam ONE offers different remediation actions for this issue, eg. Add VM to a backup job and run it, start VeeamZIP, and many more.
VM snapshot management:
Snapshots have many advantages. But if they are open for a longer time, or increase uncontrollably in size, they can become a problem.
With Veeam ONE you can manage them depending on size, age, number or status.
Backup log analysis
Veeam ONE Monitor allows you to perform log analysis according to the defined schedule or manually.
The automatic schedule can be configured with a right-click/context menu – log analysis schedule.
If you want to run it manually, just right-click the server and select “start log analysis”
After clicking the button, Veeam ONE Monitor sends a command to the Veeam ONE agent to collect the logs from the Veeam Backup & Replication server. The agent sends the compressed log files to Veeam ONE where they are examined for known exceptions and errors based on the signatures.
If you are curious what issues are examined, you can take a look at the Alarm Mangement – Intelligent Diagnostics. There you can find various predefined alarms depending on the signatures:
Veeam Intelligent Diagnostics Alerts > Support Case information
When Veeam Intelligent Diagnostics generates an alarm in Veeam ONE, a detailed knowledge base article will be displayed explaining the cause and giving some answers to possible resolutions.
If it is necessary to open a case at Veeam Support team, please search for a VID number in the alarm details:
When you open the case at https://www.veeam.com/support.html do not forget to enter the VID in the related field. This can significantly decrease the resolution time: